That being said I hopped on over to my favorite place to buy chiffon! AFC Express! It's cheap, and it's great quality---oh, that being said, I'd like to point out a couple things. 1) Polyester chiffon, you can buy anywhere. It's nice, it's pretty yada yada....but, when you cut it, it frays! NO GOOD for these ballet skirts. Unless you wanna hem, hem....me? I'm lazy! 2) AFC Express carries NYLON chiffon. Soft, sorta stretchy, and does NOT fray! Yay for not having to hem in a circle!! WOOT!
So for this project, you'll need:
1) About 1 yard of NYLON chiffon. (Savvy's existing skirt is a size 4/5 in girls. 1 yard was plenty. I'd say around size 7/8 ish, you'll need a little more than that)
2) An old tshirt or 1/4 yd of jersey knit fabric.
3) Elastic 1/4 inch.
You'll also need the obvious. A skirt you like so you can recreate it, scissors or rotary blade, sewing machine w/ thread and a work surface. For me, that's my floor.

First thing we'll do is lay out our fabric. Fabric always comes folded in half. On chiffon, you'll recognize the selvage edge immediately. It almost looks/feels crunchy, and directly across from that is the fold. Leave it folded in half the way it came. The skirt above is only ONE layer...I like TWO. :)
Once you've got your fabric laid out, open up your skirt and lay it right on top of your fabric. Now...there's TWO ways you can cut out your pattern....you've seen those jagged edge skirts right? With the points on them? They're called a "handkerchief hem". Sort of like this:

Okay, so the two ways you can cut around your skirt. If you want the hanky hem cut it like this:


From here on we're dealing with the circle skirt:
Mine's cut out:

My chiffon is cut away and I have three layers. My skirt, my two layers of chiffon.
Next we're going to cut out our waist.
Take a sharpie, pen, pencil, whatever will show up on your chiffon.
And mark out where your waist should be...like this:

Then, remove your skirt being careful not to let your chiffon layers under it go flying. Fold your circle in half.
 | ||
| The red arch represents where my markings for the waist are. |
Now you should be able to still see your waist markings in the corner where the right angle is. We're going to cut that now.


Careful not to cut too much off. If you make the hole too big, we're boned :( cut it RIGHT where your marks are.
Now set that aside.
Step 2: The Waistband
For the waist band, I like to use the bottom hem off of a stained, worn, ripped t-shirt. It can be a size too small. We all have a t-shirt from our kids that wasn't accepted at the resale shop, that no one wanted as a hand-me-down, or is even worn out enough that the shirt doesn't even suffice for play clothes. So, I'm using that. If you're using a bolt cut of jersey knit, you'll have an extra step.
Take your jersey or your t-shirt hem and lay it flat. Iron if necessary. Now, I have a cutting/measuring board, but you can easily use a ruler or measuring tape. You need a two inch wide strip.
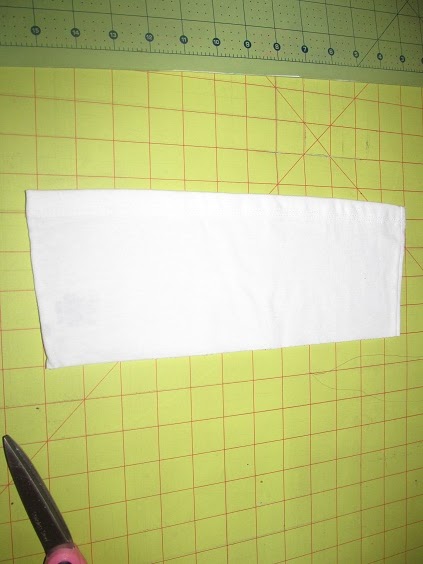
I laid the edge where I cut off my tshirt on a line on my cutting board. (Bottom)
Then, I cut off a two inch strip using my rotary blade.

Still following? Okay, moving on.
Step 3: Attaching the Skirt

Separate the skirt pieces. Flip one up and leave the other laying down. Like this.

If you have your skirt laid out like above, we're going to move our bottom skirt out of the way (In the pic below, it's above where I'm doing my pinning.)
Using pins, pin your skirt to your waist band. Like shown:


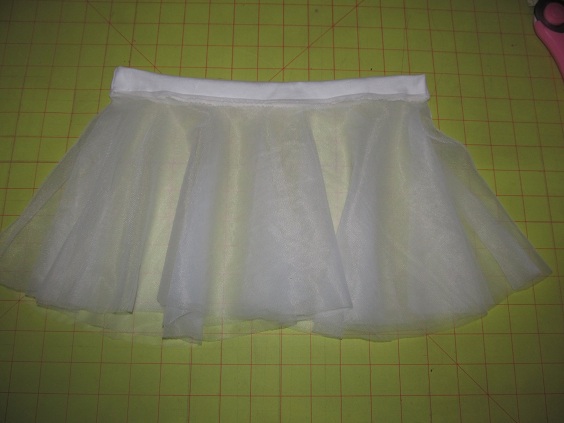
Now that both of your skirts are sewn on, it should look like this:

Moving on!
Step 4: Finishing the Waist
Take that top skirt and tuck it down INSIDE the other skirt, folding your waist in half. Line up the edges of the waist band and pin in place then stitch down. Right along your edges you just made with the zig zags.
And now, fold your waist band over again, pinning in place, or folding over as you sew...I chose to fold while I sew.


Measure your child's waist and subtract 2. That's the length of the elastic you need. Pin a safety pin to the end of your elastic

(B), when you have about a 2 inch tail, pin the elastic in place
(C), continue pushing thru until the elastic comes out the other side....again, about 2 inches are needed here.


Add a little bow if you're feeling creative and then let your little dancer twirl!!! :)

Happy Sewing!!! :)